Organize Videos
Organize Videos 

The Organize Videos tool converts a folder of videos into a structure that can be used by Theia3D. This functionality is useful when collecting large data sets.
Basic
The Basic tab is the best option when organizing videos that have user-defined file names, such as those collected using OptiTrack, Qualisys, or Vicon camera systems. To use this feature, the video files must be named using the following reserved terms, separated by underscores or periods:
Cam ID: (Required) The ID of the camera corresponding to the video file. This must be the same ID as in the calibration file.
Subject: (Recommended) Unique subject identifier (i.e. sub001).
Action: (Recommended) The action the subject is performing (i.e. walk).
Trial: (Recommended) The trial number (i.e. 001 or walk01).
N/A: (Optional) Additional terms in the filename not used by Theia3D.
While the reserved terms are separated by the delimiter, the terms themselves cannot include the delimiter. For example, if underscores are the delimiter, “slow_walk” is not a valid Action term because the program will parse it as two separate terms (“slow” and “walk”).
Acceptable delimiters include space (' '), hyphen (-), underscore (_), period (.), or space and underscore (' ' and _). Delimiters that should not be used include comma (,) and semi-colon (;).

To format the videos, select the delimiter used in the file name and then select the folder containing the videos using the Browse button. When the directory is selected the dialog will parse the name of a sample file. Note that the delimiter can be changed after the folder is selected and the sample file name will be re-parsed. Use the drop down boxes to indicate the reserved term that each part of the filename corresponds to. Click Format Data to convert the folder to the required structure. The hierachy of the created directory is Subject > Action > Trial > Cam ID. Cam ID is the only reserved term that must be included in the filename; however, it is recommended to include as many of the other reserved terms as possible.
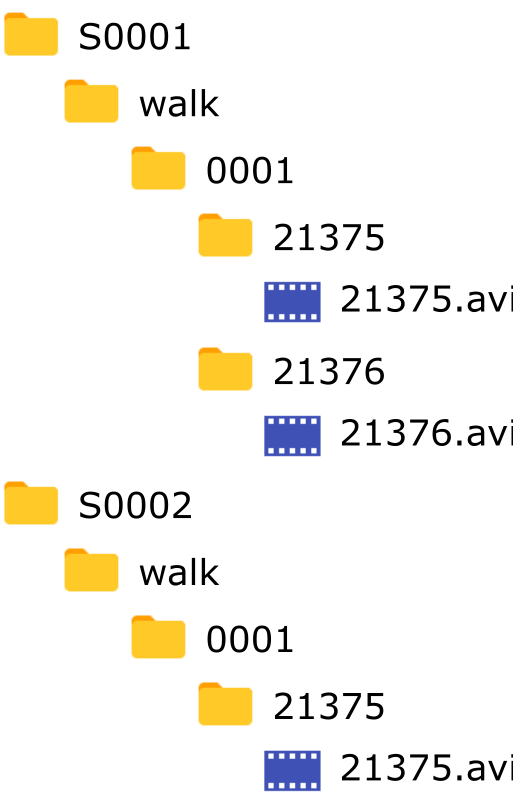
For example, consider a folder with the following video names:
S0001_Walk_001_8_21375.avi
S0001_Walk_001_8_21376.avi
S0002_Walk_001_8_21375.avi
To format these videos, the reserved terms selected are: Subject, Action, Trial, N/A, and Cam ID. The data structure after formatting is:

Advanced
The Advanced tab is the best option when organizing videos that do not have user-defined file names, such as those collected using Sony RX0 II camera systems. To use this feature, the names of the video files must end with camid_trialid, where camid is the ID of the camera that recorded the video and trialid is a unique identifier for the trial.

To format the videos, select the folder containing the videos using the Browse button. The trial grid is then created with one row for each trial. The File column of each row is filled with the trialid for that trial.
Use the Load Subject and Action Assignments button to load the subject and action IDs for each of the trials from a csv file. Each row of the csv file must contain the trialid, subjectid, and actionid of a single trial, in that order, separated by commas. For example, the csv file used to assign the subject and action IDs in the above figure was:
Press the Format Data button to format the videos in the required folder structure.
Subject and action IDs can also be manually assigned to the trials without using a csv file.
Use the Build Subjects button to open another dialog and create the subject IDs for the trials. A list of previously saved subject IDs can also be loaded and the current list of subjects can be saved using this dialog. Press the Accept button and close the dialog when the subject list is complete. To assign a subject ID to the trials, select the subject ID from the dropdown menu and press the Add button. Select the trials corresponding to the subject from the trial grid (multi-select is possible using Ctrl or Shift modifiers and by click-and-drag) and press the Finish button.
Use the Build Actions button to open another dialog and create the action IDs for the trials. A list of previously saved action IDs can also be loaded and the current list of actions can be saved using this dialog. Press the Accept button and close the dialog when the actions list is complete. To assign an action ID to the trials, select the action ID from the dropdown menu and press the Add button. Select the trials corresponding to the action from the trial grid (multi-select is possible using Ctrl or Shift modifiers and by click-and-drag) and press the Finish button.
Press the Format Data button to format the videos in the required folder structure.
Last updated
Was this helpful?

